
Desserts
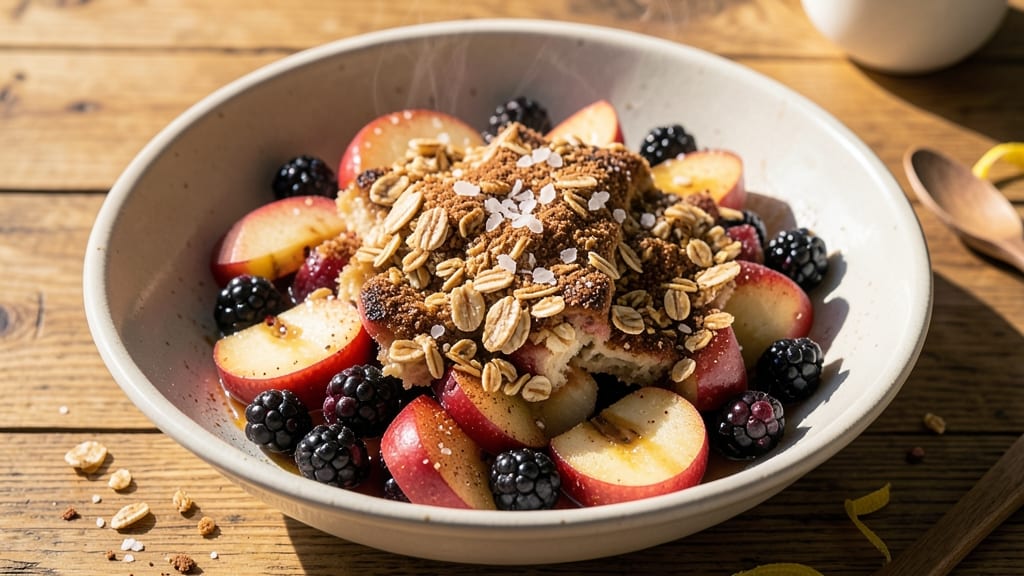
This apple blackberry crisp recipe delivers the perfect balance of warm spiced fruit and buttery oat topping—every bite combines juicy berries, tender apples, and a crispy, caramelized crust.
The secret lies in the fruit mixture: thinly sliced apples tossed with blackberries, cinnamon, and just enough sugar to enhance their natural sweetness without overpowering. I've perfected this version to stay moist in the center while developing that golden, crunchy topping that's impossible to resist.
The vanilla cream swirl adds a luxurious touch that elevates this dessert from classic to extraordinary. While traditional recipes rely solely on the oat topping, this twist incorporates a simple vanilla custard swirled into the fruit layer before baking.
It creates pockets of creamy sweetness that contrast beautifully with the tart berries and warm spices. The result is a dessert that feels both comforting and sophisticated—ideal for family dinners or special occasions.
Baking at 350°F for 35 minutes ensures the fruit is tender but not mushy while the topping achieves that perfect golden-brown crispiness. The aroma alone—warm cinnamon, caramelizing fruit, and buttery oats—will have everyone gathering in the kitchen.
Serve warm with a scoop of vanilla ice cream or a dollop of whipped cream to complete the experience.
This recipe is incredibly versatile: swap the vanilla swirl for a bourbon caramel drizzle, use gluten-free oats for a dietary-friendly version, or add a sprinkle of flaky sea salt to the topping for a sophisticated finish.
The possibilities are endless, but the foundation remains foolproof—just fruit, spices, and a buttery crust that brings it all together.
Ingredients for apple blackberry crisp
Six servings of warm spiced fruit and buttery oat topping—this crisp balances tart berries, tender apples, and a golden caramelized crust.
| Ingredient | Amount | Notes |
|---|---|---|
| Honeycrisp Apples 🍎 | 4 medium | Peeled, thinly sliced |
| Blackberries 🫐 | 1 ½ cups | Fresh or frozen, no need to thaw |
| Granulated Sugar 🍚 | ¾ cup | Light brown preferred for depth |
| Old-Fashioned Rolled Oats 🌾 | 2 ½ cups | Not quick oats, for texture |
| All-Purpose Flour 🌾 | 1 cup | For binding topping |
| Light Brown Sugar 🍚 | ½ cup | Packed, for caramelization |
| Unsalted Butter 🧈 | ¾ cup | Cold, cubed for flaky topping |
| Ground Cinnamon 🍃 | 2 tsp | Freshly ground preferred |
| Vanilla Extract 🍯 | 1 tsp | Pure, high-quality extract |
| Heavy Cream 🥛 | ½ cup | Cold, for vanilla swirl |
| Granulated Sugar 🍚 | ¼ cup | For cream mixture |
| Lemon Juice 🍋 | 1 tbsp | Freshly squeezed |
| Salt 🧂 | ½ tsp | Fine sea salt preferred |
| Flaky Sea Salt 🧂 | 1 tbsp | For topping garnish |
The apples are the foundation—Honeycrisp delivers that perfect mix of crispness and sweetness, but Fuji or Gala work too if that's what's available. Trader Joe's or Whole Foods often carry Honeycrisp in season, but regular grocery stores usually stock reliable alternatives. Thinly slice them (about 1/8-inch thick) for even cooking—they should be uniform so nothing stays undercooked. Blackberries? Fresh is ideal, but frozen works perfectly (no need to thaw) and can be even cheaper. Just toss them in the bowl with the apples after slicing—their juices will help create that signature crispy bottom layer.
No brown sugar? White sugar plus 1/2 tsp molasses gets you close, though the flavor won't be identical. The vanilla swirl is non-negotiable for that luxurious touch—Nestlé Pure Vanilla Extract is my go-to, but any high-quality extract works. For the topping, Bob's Red Mill Old-Fashioned Oats create the best texture, but Quaker Oats are a solid backup. Want to make this gluten-free? Swap the oats for certified gluten-free rolled oats and use a gluten-free flour blend. The cream mixture can be made ahead—just whisk it together and refrigerate until ready to use. No heavy cream? Full-fat coconut cream works beautifully for a dairy-free version.
Prep the fruit mixture and topping separately, then assemble just before baking to prevent sogginess. The vanilla cream swirl keeps best for 24 hours before baking, so make it first if you're prepping ahead. Store leftovers in an airtight container in the fridge for up to 5 days, though it reheats beautifully—just cover with foil and warm at 350°F for 10-15 minutes. For a restaurant-worthy presentation, sprinkle the flaky sea salt on top right before serving. The contrast with the sweet fruit is absolutely essential—Maldon flaky salt is ideal, but any good-quality flaky salt will work.
Why You'll Love This Recipe
- No Chopping Drama: I swear by this recipe because you only need to core and slice those Honeycrisp apples—no peeling, no fuss. The blackberries just get tossed in whole, and suddenly you’ve saved 15 minutes of prep time while still getting that perfect mix of juicy fruit and crunch.
- Sweet-Savory Magic: That crisp topping—oats, flour, and just a touch of sugar—turns golden and buttery, while the Honeycrisp apples add that signature snap. The blackberries burst with tartness, and honestly? It’s the kind of dessert that makes you forget it’s basically just fruit with a crunchy hug.
- Weeknight Hero: This is my go-to when I need something fast but still feels special. Serve it warm with vanilla ice cream for a casual dinner, or pack it in jars for school lunches—kids actually eat their fruit this way. (Yes, even on a Tuesday night.)
- Leftovers That Win: The best part? It tastes even better the next day, cold or reheated. I make a double batch, freeze half, and pull it out whenever I need a no-fuss treat. Plus, the ingredients are cheap—oats, flour, and seasonal fruit won’t break the bank.
Step-by-step instructions for apple blackberry crisp
This method delivers a perfectly balanced crisp with tender fruit, crispy oat topping, and rich vanilla cream swirl.
Prepare and Combine the Fruit Filling
In a large mixing bowl, combine the 4 medium peeled Honeycrisp apples, sliced into ¼-inch thick pieces, with the 1.5 cups blackberries. Add the 0.75 cup granulated sugar, 2 teaspoons ground cinnamon, and 0.5 teaspoon salt. Toss gently but thoroughly to distribute the sugar and spices evenly throughout the fruit mixture.
Transfer the fruit to a 9x13-inch baking dish and press down lightly with a spatula. This ensures the fruit makes good contact with the bottom of the pan during baking, preventing uneven cooking. The filling should look vibrant with a light dusting of cinnamon and sugar crystals on top.
Create the Vanilla Cream Swirl
In a separate bowl, whisk together the 0.5 cup cold heavy cream, 0.25 cup granulated sugar, 1 teaspoon vanilla extract, and 1 tablespoon lemon juice until smooth and slightly thickened. This mixture will add a luxurious creaminess to each bite of your crisp.
Using a spoon or small ice cream scoop, create a zigzag pattern across the top of the fruit mixture in the baking dish. The cream should be spaced evenly, with some portions touching the fruit and others exposed to create a marbled effect when baked.
Make the Oat Crumble Topping
In the same mixing bowl you used for the fruit, combine the 2.5 cups old-fashioned rolled oats, 1 cup all-purpose flour, 0.5 cup packed light brown sugar, and 0.75 cup cold cubed unsalted butter. Using your fingers or a pastry cutter, work the butter into the dry ingredients until the mixture resembles coarse crumbs with some pea-sized butter pieces remaining.
The texture should be uneven with visible butter chunks—this creates pockets of flavor and crispiness when baked. If the mixture appears too dry, add 1-2 teaspoons of ice water to help bind it together. Sprinkle the oat topping evenly over the fruit and cream mixture in the baking dish.
Bake Until Golden and Bubbling
Preheat your oven to 375°F and bake the crisp for 40-45 minutes until the fruit is tender and bubbling, and the oat topping is deep golden brown with crisp edges. The center should still have some give when pressed gently with a finger—it will continue cooking slightly after removal from the oven.
About 5 minutes before the crisp is fully baked, sprinkle the 1 tablespoon flaky sea salt evenly over the top. This adds a sophisticated finish that enhances all the sweet and spiced flavors. Remove from the oven and let rest for 10 minutes before serving to allow the juices to set and the topping to crisp up.
Serve Warm with Optional Accompaniments
Transfer the crisp to a serving platter and cut into 6 equal portions using a sharp knife. The warm fruit filling should be juicy with a slight caramelized sheen, while the oat topping remains crisp around the edges but slightly soft in the center. The vanilla cream swirl should be partially melted and integrated into the fruit.
Serve immediately with a scoop of vanilla bean ice cream or a dollop of whipped cream to complement the warm spices. The contrast of temperatures and textures makes each bite especially satisfying. Store any leftovers in an airtight container in the refrigerator for up to 3 days, though I've found it rarely lasts that long!
Pro Tips For Making Apple Blackberry Crisp
- Prep Apples Evenly: DESCRIPTION: Cut Honeycrisp apples into ¼-inch slices—thicker pieces stay rubbery, thinner ones turn to mush. I learned this the hard way after serving a crisp with uneven texture, so take the extra 2 minutes to keep them consistent.
- Mix Cold Butter First: DESCRIPTION: Toss the oats, flour, and sugar together before adding cold cubed butter—this keeps the topping crumbly and crispy. I used to melt the butter first, and the topping always turned into a sad, flat pancake.
- Skip Overmixing Blackberries: DESCRIPTION: Toss blackberries with sugar gently—just enough to coat. Mashing them releases too much juice, which makes the filling soggy. A quick shake in a bowl works; no need to get fancy.
- Bake Until Golden, Not Dark: DESCRIPTION: Pull the crisp when the topping is deep golden (not brown) and the edges are crispy—around 350°F for 35-40 minutes. I’ve walked away too long, and the oats turn bitter. Trust your nose: the smell tells you when it’s done.
Common mistakes when making your apple blackberry crisp
Overmixing the Topping
I’ve ruined more than one crisp by overworking the oat topping—turning it into a dense, flat paste instead of light, crumbly perfection. The key is to mix just until the butter is broken into pea-sized pieces and the dry ingredients cling together.
Use your fingers or a pastry cutter, but stop as soon as the mixture holds its shape when pressed. Overmixing develops gluten in the flour, which makes the topping tough and less crispy. 🌾
Skipping the Resting Time
Rushing to serve your crisp straight out of the oven is a big mistake. The fruit needs 10 minutes to set after baking, allowing juices to redistribute and the topping to crisp up properly.
If you cut into it too soon, you’ll end up with a soggy bottom and a crumbly topping that falls apart. Trust me, the wait is worth it for that perfect texture.
Uneven Fruit Distribution
Pressing the fruit mixture down lightly in the baking dish is crucial for even cooking, but I’ve seen many people skip this step entirely. When the fruit isn’t evenly distributed, some pieces stay undercooked while others turn mushy.
After tossing your fruit with sugar and spices, spread it out in the dish and press down gently with a spatula. This ensures every bite has that ideal tender-crisp balance.
Using Quick Oats
Quick oats are a common pantry staple, but they’re the wrong choice for this crisp. Their finer texture and higher starch content make the topping dense and gummy rather than crisp and crunchy. Stick with old-fashioned rolled oats—they hold their shape and create that signature crumbly texture.
If you only have quick oats on hand, pulse them in a food processor for a few seconds to rough them up, but even then, the result won’t be as good as the real thing.
Underestimating the Sugar
The sugar in the fruit filling isn’t just for sweetness—it helps caramelize the fruit and create that signature crispy bottom layer. I’ve seen recipes where people skip the sugar or use too little, resulting in a bland, watery filling.
Use the full ¾ cup granulated sugar called for, and don’t be tempted to reduce it, even if your fruit is particularly sweet. The sugar is what transforms the fruit into something truly special. 🍚
Baking at the Wrong Temperature
Baking this crisp at 350°F instead of the recommended 375°F might seem like a safer choice, but it’s a common mistake that leads to a soggy topping and undercooked fruit. The higher temperature ensures the topping gets crispy while the fruit cooks through evenly.
If you’re concerned about burning, tent the dish with foil for the last 10 minutes of baking, but never lower the temperature—it’s essential for that perfect texture.
Nutrition facts
Frequently asked questions
Can I use frozen blackberries instead of fresh?
Frozen blackberries work perfectly without thawing first. They'll release their juices during baking, creating that signature crispy bottom layer. Just toss them directly into the fruit mixture with the apples—no need to drain or rinse them.
What's the best way to store leftovers?
Store your crisp in an airtight container in the fridge for up to 5 days. To reheat, cover with foil and warm at 350°F for 10-15 minutes until the topping is crispy again. The fruit filling stays juicy and flavorful when properly stored.
Can I make this recipe gluten-free?
Yes! Swap the all-purpose flour for a 1:1 gluten-free flour blend and use certified gluten-free rolled oats. The vanilla cream swirl remains unchanged, and the texture will still be delicious. Just ensure all ingredients are labeled gluten-free to avoid cross-contamination.
Why does my topping get soggy?
Soggy toppings usually happen from overmixing the topping or skipping the 10-minute resting time after baking. The butter should be cold and cut into pea-sized pieces, not fully incorporated. Always let the crisp rest before serving to let juices set properly.
What's the best apple variety for this recipe?
Honeycrisp is ideal for its perfect balance of sweetness and texture, but Fuji, Gala, or Braeburn work well too. Avoid overly tart varieties like Granny Smith—they won't caramelize as beautifully. Thinly sliced apples (about 1/8-inch thick) cook evenly every time.